Sunday, May 31, 2020

Butterfly Cage and Paper Airplanes 1 VI 20

Hello Room 222!

Today is Day 80 of our stay-at-home time. Keep reading to see what is happening with the caterpillars and how to fold some awesome paper airplanes!

CHRYSALIDS


As of Saturday, all of the caterpillar are now in the pupa or chrysalis stage of the butterfly life cycle. Each caterpillar started to form the chrysalis inside its exoskeleton and then it shed its exoskeleton one last time. The chrysalis is about 1 cm shorter than the length of the fully grown caterpillar. 

In nature, the chrysalids hang upside down, so I have attached them to the top of a butterfly cage. I put them in a butterfly cage so that when the butterflies come out, they will be safe and not flying around my home!

Look carefully at the chrysalis in the above photo. Does it look like a caterpillar? Does it look like a butterfly? What is happening inside?

PAPER AIRPLANES

Your language assignment on Google Classroom today is about the SpaceX Falcon 9 Rocket taking the Dragon Crew capsule to the International Space Station . Did you know that most astronauts are pilots  (people that can fly airplanes)? Knowing about planes and about how things fly is really interesting. You can do this by making and flying paper airplanes. Here is a video that show you how to make 5 different models:


Thursday, May 28, 2020

Chrysalis and Lemonade! 29 V 20

Hello Room 222,

Today is Day 77 of our stay-at-home time. Keep reading to learn more about what is happening with the caterpillars at my home. Also, there is a recipe to make homemade lemonade!

CHRYSALIS


The Painted Lady caterpillars continue to change. Now each caterpillar is changing into a chrysalis which is the pupa stage of its life cycle. The caterpillar makes a small pad of sticky web and attaches itself to the paper liner at the top of the container. The caterpillar makes the chrysalis and sheds its skin or molts one last time. It took 8 days for this caterpillar to grow from a 1 cm long caterpillar and change into a chrysalis. Some of the caterpillar frass is now red. Do you know why?

Cool Chrysalis Facts:

* Inside the chrysalis or pupa, the caterpillar is going through metamorphosis to change into a butterfly.
* It looks like the chrysalis is resting, but there are LOTS of changes going on inside.
* It's called a "chrysalis" because of the gold colour on the outside. The Greek word "chrysos" means "gold".
* The chrysalis must hang upside down or the butterfly may not be able to come out easily.
* A Painted Lady Butterfly comes out of its chrysalis after about 10-12 days.
* One is called a chrysalis, but two (or more) are called chrysalids.

HOW TO MAKE HOMEMADE LEMONADE


On these warmer days, it's nice to have a cold drink to cool down from the heat. Homemade lemonade is a delicious choice!

You will need:

* one lemon
* 2 tablespoons white sugar
* hot water/cold water
* ice cubes

What to do:

* Boil some water in the kettle.
* Put the sugar in a heatproof container and add 1/4 cup (65 mL) hot water and stir to dissolve the sugar.
* Wash and cut the lemon in half. Squeeze out the juice and discard the seeds. Measure out 3 tablespoons of lemon juice and add it to the sugar water mixture and stir.
* Add 3/4 cup of cold water to the mixture and stir to combine.
* Add some ice cubes to a glass and pour the lemonade into the glass.
* ENJOY!

Tuesday, May 26, 2020

Caterpillar Photos, Facts and a Paper Model! 27 V 20

Hello Room 222!

Today is Day 75 of our stay-at-home time. Keep reading to see what's happening to the caterpillars and to learn the answers to some of your questions. Also there are instructions to make a paper caterpillar that moves...make two and you can have a race!

CATERPILLAR UPDATE


The caterpillars are eating a lot and making lots of "frass". They are making some more webs to protect themselves and continue to molt and leave the old black exoskeletons behind. They are getting fatter.


I was removing some of the frass from a container with a toothpick and the caterpillar crawled on it! This was a great chance to get a close up photo of the caterpillar prolegs, the spiracles and the spikes on the exoskelton. Also the underside or ventral side of the caterpillar is a lighter colour than the top or dorsal side.


The caterpillars seem to stop growing once they get about 3 and 1/2 cm long. After they molt, the caterpillars have different patterns and colours and spikes on their exoskeletons. The caterpillar at the top of this photo is older than the one at the bottom of the photo.

COOL CATERPILLAR FACTS

* The name "caterpillar" comes from the old French and English words for "hairy cat".
* Caterpillars can't see well. They have 12 simple eyes or stemmata on their heads which can only see light and dark.
* They have over 4,000 muscles in their bodies. Most are used for moving by squeezing and unsqueezing their muscles. No other animal on Earth moves like a caterpillar.
* They don't have teeth, but their mouth parts, called mandibles can chew leaves. They chew side-to-side (not up and down).
* The webs are made out of "silk" which is caterpillar saliva that come out liquid. but hardens in the air to make the sticky webs.

HOW TO MAKE A PAPER CATERPILLAR THAT MOVES

Try this cool and easy paper craft and make a paper caterpillar that moves!


Here is the link to the video:

https://www.youtube.com/watch?v=3v_JYQC30i4&feature=youtu.be

Sunday, May 24, 2020

Caterpillars and Frogs 25 V 20

Dear Room 222,

Today is Day 73 of our stay-at-home time.

Keep reading to learn more about the live caterpillars at my home AND how to make a jumping frog from a piece of cardboard.

CATERPILLAR UPDATE


The caterpillars are growing! I have had them now for 5 days. Last Wednesday, the caterpillars were 1 cm long. Now, the caterpillars are 3 and 1/2 cm long!

The caterpillars are now making sticky webs and hiding under the web. Do you know why? They do it to protect themselves because the animals that like to eat them, do not like to eat the sticky web.

The patterns of dots and stripes on the skin or exoskeleton change every time the caterpillars molts or wiggles out of its skin. (Insects have their skeletons on the outside of their bodies called exoskeletons. Humans have their skeletons on the inside of their bodies, called endoskeletons.)

These caterpillars have 5 pairs of prolegs (10 prolegs) and 3 pairs of true legs (6 legs).


The old skin or exoskeleton has spikes on it. The caterpillars leaves it behind like an old sock and has new skin and new spikes. The spikes are another way to stop animals from eating them.

The holes on the sides of the caterpillar are called "spiracles" and the caterpillar uses these holes to breathe air.

At this point in the life cycle, some of the caterpillars spikes are white and some are black.

The caterpillar frass (or poop) is in the shape of a cylinder because that is the shape of the inside of the caterpillar.

HOW TO MAKE A JUMPING FROG

Your assignment on Google Classroom today is about the life cycle of the frog. Here is a video that shows you how to make a jumping frog out of a piece of cardboard. It really works!

Thursday, May 21, 2020

Caterpillars!


The caterpillars are GROWING and growing fast! Yesterday they were about 1 cm long and now they are about 1 and a half cm long.

You can see their 6 real legs (because they are insects) and their fake legs or prolegs which help them move.

A caterpillar's only job is to eat as much as possible. The light brown stuff  is their food because we are raising them indoors. In real life these caterpillars would eat leaves outside.

Caterpillars only eat. They do not drink. Of course if they eat a lot, they also have to go to the bathroom a lot. The little pellets in the photo are pieces of  "frass", which is the science name for caterpillar poop.

As caterpillars eat they grow bigger. Their skin or exoskeleton splits and the caterpillar crawls out (molts). The black spots in the photo are the old exoskeletons.

I hope you are thinking of lots of questions to ask about the caterpillars!

Fudge!


This is one of the first recipes that my children made at home. With only two ingredients, it is a quick and easy homemade treat!

You will need:

* one package chocolate chips (300g)
* one can of sweetened condensed milk (NOT evaporated milk)

What to do:

* Put the chocolate chips and the sweetened condensed milk in a heatproof bowl. (I used a 4-cup measuring jar.)
* Microwave at half-power (50%) for 30 seconds at a time, stirring between times. The chips will melt and make a smooth mixture. I microwaved mine for 30 seconds, three times.
* Line a 20 cm by 20 cm square pan with wax paper, so it will be easy to take out the fudge.
* Pour the mixture into the prepared pan.
* Put the pan into the fridge for at least 2 hours.
* Cut into very small bit-sized squares and serve. YUM!

SURPRISE! New science project...


Yesterday, I got this box delivered to my home. I ordered the things inside for a new science project...
I sent an email to families to see if any of the students could guess what was inside. Some of the guesses were very close!

Here are some more pictures...can you see what the science project is now?


I put a paperclip beside the last one to show that it is less than one cm long.


Tuesday, May 19, 2020

Random Facts and a New Folded Book! 20 V 20

Hello Room 222!

Today is Day 68 of our stay-at-home time.

Keep reading to see our new class book of random science facts and how to fold a new kind of little book!

RANDOM SCIENCE FACTS (From your research projects...)


HOW TO MAKE A MEANDER FOLDED BOOK

This folded book project takes a regular piece of paper and makes a 16 page folded book. Add some cardboard covers and you have a fun little book that you can write or draw in.

It's called a "meander book" because the pages "meander" or follow a twisting path.


You will need:

* paper
* scissors
* pencil
* cardboard (I used an old tissue box.)
* glue or tape

What to do:

* Fold the paper into equal sections by folding the paper in half, long edge to long edge and then short edge to short edge (4 fourths)
* Now, fold each of the two long edges to the centre fold line. You now have 8 eighths.
* Next, fold each of the two short edges to the centre fold line. You now have 16 sixteenths.
* With a pencil draw three lines on some of the fold lines, like in the photo.
* Cut along the pencil lines.
* Fold the pages by folding the small rectangle sections back and forth, accordion-style, until you have a folded up all 16 pages into a single pile.
* If you want, you can add a cardboard front and back cover. Cut the cardboard a bit bigger than the size of the book. (A regular sheet of paper will need covers about 7 and 1/2 cm long and 6 cm wide.
* Draw or write in your new little book!


Thursday, May 14, 2020

Victoria Day and Crepes 15 V 20

Hello Room 222!

Today is Day 63 of our stay-at-home time.

Keep reading to learn about the Victoria Day holiday in Canada and how to make crepes (thin pancakes). Yum!

VICTORIA DAY HOLIDAY - MAY 18, 2020


On Monday May 18th, Canada celebrates Victoria Day. Victoria Day is a holiday in Canada that celebrates Queen Victoria's birthday. Here are some facts about Victoria Day:

* Queen Victoria was born on May 24, 1819. (That's 201 years ago.)
* Queen Victoria became the Queen of England when she was only 18 years old.
* She was queen for over 63 years.
* Victoria Day is the held on the last Monday in May before May 25th.
* Canada has celebrated Victoria Day since 1845. (That's 175 years.)
* It is traditional to watch fireworks displays on Victoria Day.
* When she got married, she wore a white wedding dress and after that it became fashionable for brides to wear white wedding gowns.
* Queen Victoria's first name is actually Alexandrina (Victoria is her second name.)
* Queen Victoria is Queen Elizabeth II's great-great grandmother.


HOW TO MAKE CREPES

Crepes are thin pancakes that are easy to make and can be eaten as part of a nutritious meal or as sweet dessert treat! (This recipe does not use eggs.)

Please note:  It's important that the crepe batter "rest" for at least 30 minutes or more in the fridge for the flour to absorb the liquid.


You will need:

I cup milk
1/2 cup water
2 tablespoons oil
1 cup flour
1 tablespoon sugar
1/2 teaspoon salt
(plus oil or butter for cooking)

What to do:

* In a medium sized bowl (I used a large measuring cup), mix together the milk, water and oil.
* Now add the flour, sugar and salt and mix together well until most of the lumps are gone.
* Put the flour in the fridge for at least 30 minutes before using.
* Heat a medium sized frying pan on medium heat.
* Add a bit of oil or butter and spread it around the bottom of the frying pan.
* Add about 1/4 cup of the batter to the pan and tilt the pan around to coat the bottom to make a large circle.
* After about 2 minutes, flip the crepe over to cook the other side. When done, put on a plate while you cook the rest of the crepes.
* Continue to add a bit of oil in between cooking each crepe and cook the crepes until all the batter is used. Makes 8-10 crepes (about 22 cm wide).

To serve:

I like to serve crepes different ways. You can fold the crepe into quarters and put toppings on top. You can also put the toppings inside the crepe and roll it up.  Here are some topping suggestions:

- maple syrup
- lemon juice and sugar
- yogurt and blueberries
- peanut butter and banana slices

You can also put cooked vegetables, chicken, ham, or eggs inside. It's good to try different things!

If you make crepes, please send me a photo to show me how you served your crepes. I like to learn different toppings and fillings for crepes!

Tuesday, May 12, 2020

The Knitting Post 13 V 20

Hello Room 222!

Today is Day 61 of our stay-at-home time.

Keep reading to get ideas for things to make with your knitting spool knitted cord AND how to make yarn out of a plastic bag!

WHAT TO DO WITH YOUR KNITTED CORD

Here are some photos to give you ideas for what to make with your knitted cord.


HOW TO MAKE YARN OUT OF A PLASTIC BAG


If you run out of yarn, you can make some out of a plastic bag! It's not as easy to use as yarn is with the knitting spool, but it does reuse a plastic bag. The idea is to make one looooooooong strip of plastic.

You will need:

plastic bag, scissors, ruler

What to do:

* Cut off the handles and the bottom of the bag. You will be left with a large tube or open cylinder.
* Start cutting a strip of plastic 2 cm or 3 cm wide and keep cutting in a spiral around and around the circle shape of the bag in one long strip until you get to the end.
* Wind the plastic strip into a ball so it does not get tangled.
* When using your plastic yarn remember to TWIST the plastic strip as you work. (Twisting makes the plastic strip stronger.)
* CAREFUL when you start to not pull the cord too hard or it might stretch and break. Use the flat end of your knitting tool to push the plastic cord down the centre hole of the spool.

Sunday, May 10, 2020

Chickens and Checkers 11 V 20

Hello Room 222!

Today is Day 59 of our stay-at-home time.

Keep reading to find a fun chicken math game and how to make your own game of checkers!

CHICKEN COOP MATH GAME


Since you are writing about chickens this week, I thought it would be fun to play a chicken game! Use what you know about 100 and fractions to play this online game. Here is the link to the PBS kids website to play the game:

https://pbskids.org/peg/games/chicken-coop


HOW TO MAKE A GAME OF CHECKERS


You will need:

* paper, scissors, ruler, pencil, crayon, aluminum foil and cardboard

What to do:

Make the checkerboard

* Draw a grid of  64 squares using a ruler and a pencil. To fit on a regular sized piece of paper, the sides of the squares must be 2 and a half cm long.
* Draw the vertical lines and then the horizontal lines. Cut the extra paper off to make the big square checkerboard.
* Using a crayon (or marker or pencil crayon) colour in every other square.

Make the game pieces

* Make 12 small balls of aluminum foil for the first player.
* Make 12 small circles of cardboard for the second player. (I traced the end of a glue stick for the circle shape.)

*** You can use anything for the game pieces, for example: dried beans, plastic bottle caps or beads.

Have fun playing Checkers using your very own homemade checkerboard!

Saturday, May 9, 2020

Surprise Packages, KCOEs and Knitting 9 V 20


Thank you to all the families for coming by today to pick up the packages for the children. (Also, thank you once again to Sophia and her family for permission to use their front yard.)

Above is a "class photo" I took of all the KCOE chickens before I randomly stuffed them into envelopes. Can you find yours?

Also, I've taken pictures of the four steps of the knit stitch using the "knitting spool" to help you get started. If you want to look for projects on the internet, spool knitting is also called "corking" and "French knitting". When I was a child, my knitting spool was called a "Knitting Nancy"...since that is my first name, maybe that's why I like knitting so much!

It was WONDERFUL to see everyone this morning! I know it was hard to recognize me because of the face mask. As well, I have trouble wearing my glasses with the mask because my glasses fog up and I can't see!

Have fun learning and trying new activities! Here are some hugs for you...


Thursday, May 7, 2020

Mother's Day and Ms. R's Research Project


Happy Mother's Day to all the Room 222 families!

Today is Day 56 of our stay-at-home time. Keep reading to see a recipe for a chocolate dessert for a special occasion and an example of a "cycle" research project.

CHOCOLATE DIPPED TREATS

Looking for a fast and easy dessert to make for Mother's Day?

Here is a recipe for chocolate dipped treats.


You will need:

1 cup (250 mL) chocolate chips
orange segments, almonds, rice cakes ( You can use whatever you like...)

What to do:

* Cover a plate or pan with aluminum foil, (so the chocolate will not stick).
* Make sure the plate or pan will fit in the fridge.
* Put the chocolate chips in a heat proof bowl. (I used a glass cup measure.)
* Melt the chips in the microwave oven at half or 50 % power for 30 seconds.
* Stir the chips with a spoon and keep heating the chocolate 30 seconds (half power) at a time, stirring after each time, until it is almost all melted. (I repeated the heat-stir pattern four times, but your microwave may need more or less time.)
* Take out the bowl and stir the chocolate until it is all melted and smooth.

Start dipping the treats:

* For orange segments, I dipped half in the chocolate and put the pieces on the foil covered plate.
* For almonds, I put the almonds in a small bowl and poured some of the melted chocolate on top and mixed it with a spoon to coat them. Then I used a spoon and dropped groups of 5 almonds on the foil covered plate.
* For the rice cakes, I crumbled the rice cakes in a bowl and poured melted chocolate on top. I mixed it to coat the pieces with chocolate. I put it on the foil and shaped the "blob"  into a rectangle (which I cut into slices later).
* For the writing, I poured the melted chocolate into a small ziplock bag, sealed the bag and cut one of the corners off with a pair of scissors. Using the bag I squeezed the chocolate out over the foil wrapped plate and wrote the word "Mom" in cursive.
* Using the bag of chocolate, squeeze out "doodles" on the foil.
* PUT THE PLATE IN THE FRIDGE for the chocolate to harden.
* Peel the treats off the foil and arrange on a plate just before serving. ENJOY!

NOTES - You could also dip many other things: strawberries, pretzels, marshmallows and really whatever you like!


SAMPLE RESEARCH PROJECT

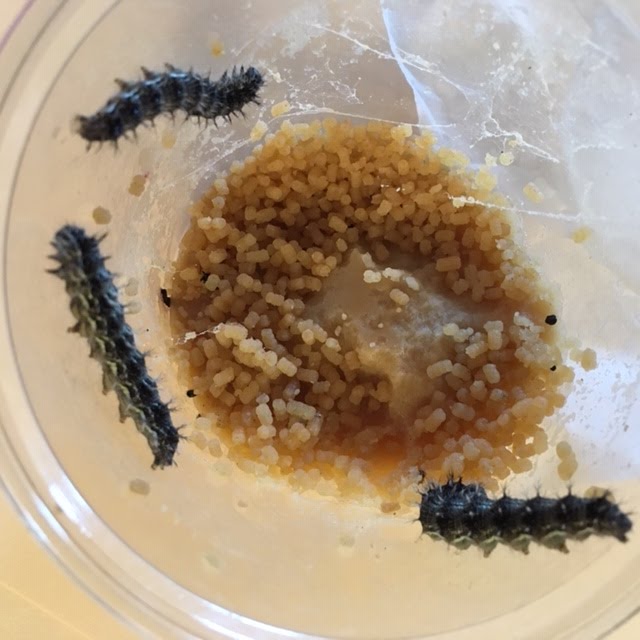
Today I posted an assignment on Google Classroom for you to research a plant, tree, animal or earth cycle. I chose to research yeast because I have a yeast "sourdough starter" at home and I want to learn more about yeast. This is my "sourdough starter" that I have at home. My friend Jennie gave it to me. I have to feed it flour and water every week to keep it alive. The yeast eats sugar and makes carbon dioxide gas (CO2). That is why the picture on the right has more because it has more bubbles. The bubbles you see in bread come from the gas made by yeast.

What cycle did you choose to learn more about?
I chose the life cycle of yeast.

Who discovered it?
Louis Pasteur, a French scientist, discovered how yeast works.
It's Latin or science name is Saccharomyces cerevisiae which means "sugar eating fungus". 

When was it discovered?
It's been used for thousands of years but in 1859 (161 years ago) Louis Pasteur discovered that yeast was what made bread rise.

Where do you find it?
Yeast is found everywhere on Earth, even at the North Pole!

Why is it important to Earth?
Yeast is used in making foods like bread, soy sauce and vinegar. It also helps you digest food.
It is used to make medicines like insulin.

How long is the life cycle or how long does the cycle last?
As long as yeast has sugar to eat it can live for years.

Cool fact #1
Yeast is not an animal and is not a plant. It has only one cell. (Humans have 100 trillion cells!)

Cool fact #2
Each yeast is sphere or oval shaped and is smaller than 10 micrometers wide. (A micrometer is one millionth of a metre.)

Tuesday, May 5, 2020

Rainbow Circle Art and Paper Necklaces 6 V 20

Hello Room 222!

Today is Day 54 of our stay-at-home time.

RAINBOW CIRCLE ART


Here is the wonderful rainbow circle art that the students did in response to a math bonus challenge!


MOTHER'S DAY (MAY 10th)

Mother's Day is on Sunday. It's traditional to make homemade cards and gifts to give on this day. If  you are looking for ideas, there are lots of art and crafts activities on this blog to help you.

Another idea is to use paper to make a necklace for your mother. Here's how:


Do you remember when we made LLLOOOONNNGGG paper chains? They were SO long we had to go into the hall to measure them!

This paper necklace is basically a paper chain BUT it is much smaller and the paper strips are folded in half first before the rings are put together. The reason for this is that it makes the paper chain stronger.

You will need:

* paper (I used pages from a food magazine), a ruler, scissors, pencil, clear tape

What to do:

* Cut paper rectangles about 7 cm long and 1 and a half cm wide BUT you can make them any size. (I used about 40 rectangles for my necklace, but make some extra, just in case.)
* Fold the rectangles in half, long edge to long edge.
* Make circles by forming a circle shape and tape the ends of the rectangle together.
* Start making the paper chain by looping the paper rectangles through another paper circle and taping the circle closed.
* Keep making the paper chain longer until it is long enough to go over an adult's head.
* Close the paper chain circle by using a paper rectangle to loop through the first and last circle and tape that final circle closed.
* If you like, cut a cardboard circle or heart (I used cardboard from a tissue box), and write a message on it.
* Attach the circle or heart to one of the paper chains by looping one of the paper rectangles through a chain and taping the two ends on the back of the cardboard.

Monday, May 4, 2020

Author Reply and Mondrian Math Art 4 V 20

Hello Room 222!

Today is Day 52 of our stay-at-home time.

THE BIG ALONE

Remember when you read the book, The Big Alone by The Avenado Sisters? Well, I emailed your comments and questions to them and they wrote you back! Here is what they said:


VIDEO FROM OUR DAVISVILLE PUBLIC SCHOOL STAFF

The staff at our school put together a video for the students to say "hello". Here is the link:

https://www.wevideo.com/view/1684157997


MONDRIAN MATH ART

This week you are learning about how to measure AREA in math. Area is the amount of space on a flat surface. You can use what you know about geometry and area to make some art!

The Dutch artist Piet Mondrian (1872-1944) was born in The Netherlands. He is famous for his paintings that use only the 3 primary colours ( red, blue, yellow) plus black and white. In 2015, one of his paintings sold for over $50 million dollars!


As you can see, he used straight lines and based his design on squares and rectangles. He used what he knew about geometry and area to make his art. This kind of painting is called "abstract" painting because it is a design and not a picture of anything.

If you want to know more about Piet Mondrian, you can learn more about him here:

https://www.slideshare.net/duniwayart/mondrianppt


How to Make Art Like Piet Mondrian

You will need: paper, pencil, black marker, ruler, crayons/pencil crayons/markers in blue/red/yellow

* Make a grid or squares on your paper using pencil. I used squares with 3 cm sides but you could use any length. Mark 3 cm points horizontally along the paper (practice your skip-counting by 3's) near the top of the paper and do it again across the middle of the paper.
*  Next line up the two dots and draw vertical lines across the page.
* Then do the same two lines of marks, 3 cm apart vertically, line up the two marks with the ruler and draw horizontal lines across the paper.
* You now have grid or squared paper. (If there are squares that are incomplete, you can cut them off the edges with a pair of scissors.)
* Then, use a black marker to go over the pencil lines to create different sizes of squares and rectangles.
* Finally, colour in the squares and rectangles with red, blue, yellow and black. Leave some of the spaces white.


NOW...let's use what you know about AREA to answer some questions using my finished Mondrian-inspired art.


1. What is the total area of the art in square units?

2. What is the area of each of the different colours (red, blue, yellow, white)?

3. Which colour takes up the MOST area ?

Email me the answers to these quesions and if you make art like this, send me a photo. I really like seeing your work!